# Cordova plugins
Plugins create a bridge between the hardware of the device (GPS sensor, camera, network,...) and the functionalities (address book, calendar,...) not normally available to web apps.
A plugin consists of one JavaScript file with corresponding native code per platform. In our code we only need to refer to a certain function or method from the Javascript file. We do not have to worry about what happens in the background (the communication from Javascript with the native code).
Apache maintains a number of plugins, but the system is completely open so that other developers can write their own plugins.
You can search for available plugins at:
In this chapter you will learn how to install and invoke a plugin. The data you get back from the hardware will be shown on the screen and incorporated into a practical application at the end.
- Create a new project:
$ cordova create plugins be.yourName.plugins Plugins
$ cd plugins
$ cordova platform add browser android
2
3
- Delete the entire www folder and replace it with the files from this file: start_plugins.zip.
- Examine the files.
- Test the app in Chrome with the command:
$ phonegap serve
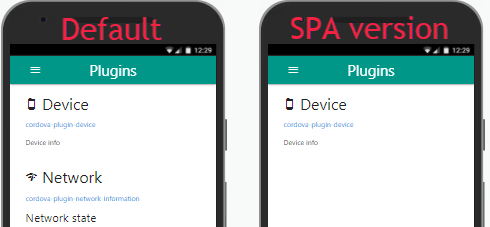
# Single Page Application (SPA)
We are going to build the application completely around a single page application or SPA. For the time being, there is no sign of this.
# index.html
<!DOCTYPE html>
<html lang="nl">
<head>
<meta charset="UTF-8">
<meta name="viewport"
content="user-scalable=no, initial-scale=1, maximum-scale=1, minimum-scale=1, width=device-width">
<link rel="stylesheet" href="https://fonts.googleapis.com/icon?family=Material+Icons"/>
<link rel="stylesheet" href="https://cdnjs.cloudflare.com/ajax/libs/materialize/1.0.0/css/materialize.min.css"/>
<title>Plugins</title>
<style>
#compassView {
position: relative;
text-align: center;
}
#compassImg {
position: relative;
top: -22px;
left: 0;
}
</style>
</head>
<body>
<!-- Fixed navbar -->
<div class="navbar-fixed">
<nav class="teal">
<div class="nav-wrapper container">
<a href="#!" class="brand-logo center">Plugins</a>
<a href="#!" data-target="nav-mobile" class="sidenav-trigger show-on-large">
<i class="material-icons">menu</i>
</a>
</div>
</nav>
</div>
<!-- Fixed sideNav -->
<ul id="nav-mobile" class="sidenav">
<li><a href="#!" data-show="tabDevice"><i class="material-icons">smartphone</i>Device</a></li>
<li>
<div class="divider"></div>
</li>
<li><a href="#!" data-show="tabNetwork"><i class="material-icons">network_check</i>Network</a></li>
<li>
<div class="divider"></div>
</li>
<li><a href="#!" data-show="tabCompass"><i class="material-icons">my_location</i>Compass</a></li>
</ul>
<!-- Grid -->
<div class="container">
<div class="row spa" id="tabDevice">
<div class="col s12">
<h4><i class="material-icons">smartphone</i> Device</h4>
<p><a href="https://cordova.apache.org/docs/en/latest/reference/cordova-plugin-device/index.html">cordova-plugin-device</a>
</p>
<div id="model"></div>
</div>
</div>
<div class="row spa" id="tabNetwork">
<div class="col s12">
<h4><i class="material-icons">network_check</i> Network</h4>
<p>
<a href="https://cordova.apache.org/docs/en/latest/reference/cordova-plugin-network-information/index.html">cordova-plugin-network-information</a>
</p>
<h5 id="networkState"></h5>
</div>
</div>
<div class="row spa" id="tabCompass">
<div class="col s12">
<h4><i class="material-icons">my_location</i> Compass</h4>
<p>
<a href="#!" id="startCompass" class="waves-effect waves-light btn orange">Start</a>
<a href="#!" id="stopCompass" class="waves-effect waves-light btn orange">Stop</a>
</p>
<p>
<a href="https://cordova.apache.org/docs/en/7.x/reference/cordova-plugin-device-orientation/index.html">cordova-plugin-device-orientation
(v7)</a>
</p>
<div id="compassView">
<h5 id="compass"> </h5>
<p>▼</p>
<img id="compassImg" src="assets/compass.png" width="100%" alt="">
</div>
</div>
</div>
</div>
<script src="https://cdnjs.cloudflare.com/ajax/libs/jquery/3.5.1/jquery.min.js"></script>
<script src="https://cdnjs.cloudflare.com/ajax/libs/materialize/1.0.0/js/materialize.min.js"></script>
<script src="cordova.js"></script>
<script src="js/device.js"></script>
<script src="js/network.js"></script>
<script src="js/compass.js"></script>
<!-- JavaScript defer: https://www.w3schools.com/tags/att_script_defer.asp -->
<script defer src="js/app.js"></script>
</body>
</html>
2
3
4
5
6
7
8
9
10
11
12
13
14
15
16
17
18
19
20
21
22
23
24
25
26
27
28
29
30
31
32
33
34
35
36
37
38
39
40
41
42
43
44
45
46
47
48
49
50
51
52
53
54
55
56
57
58
59
60
61
62
63
64
65
66
67
68
69
70
71
72
73
74
75
76
77
78
79
80
81
82
83
84
85
86
87
88
89
90
91
92
93
94
95
96
97
98
When opening the app, only the first component (the first tab) should be visible.
We can easily accomplish this using CSS.
Note that each component has a unique name (div#tabDevice, div#tabNetwork and div#tabCompass) and a common class (div.spa).
- Add to the internal style tag the properties for
.spaand#tabDevice.<style> .spa { display: none; } #tabDevice { display: block; } #compassView { ... } #compassImg { ... } </style>1
2
3
4
5
6
# js/app.js
The navigation links were given a data-show attribute.
This specifies the tab to be shown when you click on the link.
The navigation is already present on the index page, but you are now going to add the interaction to app.js.
$(function () {
    document.addEventListener("deviceready", onDeviceReady, false);
});

function onDeviceReady() {
    console.log('Device is ready');
    Device.init();
    Network.init();
    Compass.init();
};
2
3
4
5
6
7
8
9
10
- Within
$(function(){ ... }add the following code:
$(function(){
	document.addEventListener("deviceready", onDeviceReady, false);

	$('.sidenav').sidenav();	/* https://materializecss.com/sidenav.html */

	$('.sidenav a').click(function () {
		$('.spa').hide();
		$('#' + $(this).data('show')).show();
		$('.sidenav').sidenav('close');
	});
});
2
3
4
5
6
7
8
9
10
11
- Each time you click a navigation link, all tabs are closed (line 7).
- On line 8, the value of the attribute
data-showis read.
We use this to make the desired tab visible again.
For example:data-show="tabDevice"generates the code$('#tabDevice').show(). - Finally, on line 9, we close the navigation again.
# Adding plugins
Three plugins are used in this application. We are going to install these first.
- Execute the following commands:
$ cordova plugin add cordova-plugin-device
$ cordova plugin add cordova-plugin-network-information
$ cordova plugin add cordova-plugin-device-orientation
2
3
- Or in one command:
$ cordova plugin add cordova-plugin-device cordova-plugin-network-information cordova-plugin-device-orientation
The installed plugins will be in the plugins folder. In our code we do not need to change anything. You may not even make a reference to the corresponding javascript documents. Each time you compile the application, the appropriate references will be automatically inserted into the code.
TIP
- As you can read in the console, the plugin cordova-plugin-device-orientation is obsolete and
you can now use the native orientation API.
To remain compatible with older Android devices, we are going to integrate the plugin anyway. - All plugins you install will be automatically added to the package.json file:
{
    ...
    "devDependencies": {
        "cordova-android": "^9.1.0",
        "cordova-browser": "^6.0.0",
        "cordova-plugin-device": "^2.0.3",
        "cordova-plugin-device-orientation": "^2.0.1",
        "cordova-plugin-network-information": "^3.0.0",
        "cordova-plugin-whitelist": "^1.3.5"
      },
      "cordova": {
        "plugins": {
          "cordova-plugin-whitelist": {},
          "cordova-plugin-network-information": {},
          "cordova-plugin-device-orientation": {},
          "cordova-plugin-device": {}
        },
        "platforms": [
          "browser",
          "android"
        ]
      }
}
1
2
3
4
5
6
7
8
9
10
11
12
13
14
15
16
17
18
19
20
21
22
23 - You can remove a plugin with the command:
$ cordova plugin remove <plugin>
# or replace 'remove' with 'rm'
1
2
# smartphone Device
With the plugin cordova-plugin-device we can retrieve information about the device and platform, among other things.
Read the documentation carefully. Also, look at the comments (quirks).
Not all features are available on all platforms!
# js/device.js
const Device = function () {
    const init = function () {
        const data = 'Device info';
        $('#model').html(data);
    };
    return {
        init: init
    };
}();
2
3
4
5
6
7
8
9
For now, only the text Device info is shown on the screen. We will now replace this text with useful information about our device
- Add within the init method
console.log(device).
const init = function () {
	console.log(device);
	let data = 'Device info';
	$('#model').html(data);
};
2
3
4
5
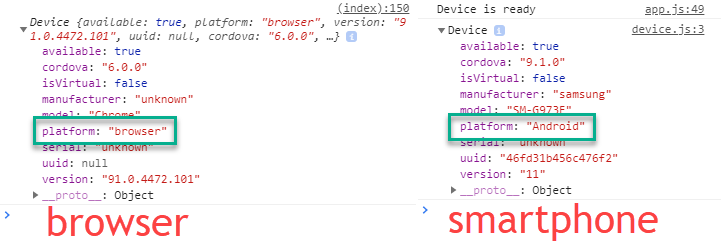
The information you get back from a plugin is usually in the form of a JSON object.
Via console.log(device) you can visualize the content of the JSON object in the console and filter out the relevant information.
For now we are still testing in the browser and the info is quite limited.
- Test the app also on a smartphone (
$ cordova run android) and compare the data in the console:
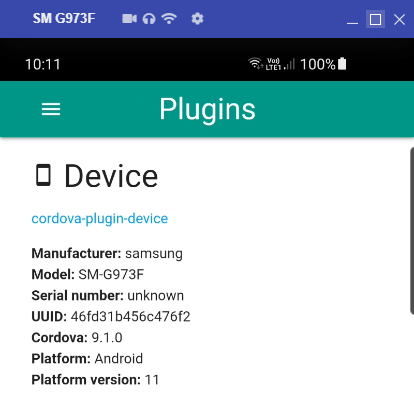
- Process the information from
deviceinto the variabledata:
const init = function () {
    console.log(device);
    const data = `
            <b>Manufacturer: </b>${device.manufacturer}<br>
            <b>Model: </b>${device.model}<br>
            <b>Serial number: </b>${device.serial}<br>
            <b>UUID: </b>${device.uuid}<br>
            <b>Cordova: </b>${device.cordova}<br>
            <b>Platform: </b>${device.platform}<br>
            <b>Platform version: </b>${device.version}
        `;
    $('#model').html(data);
};
2
3
4
5
6
7
8
9
10
11
12
13
# network_check Network
The plugin cordova-plugin-network-information gives us information about our network connection. Is the network active, are we connected by WiFi or by 4G, etc ...
Based on this information, we can decide whether or not to perform a certain action. Suppose you develop an app that allows you to take photos and upload them to your Dropbox, then you are probably only going to upload files if you are connected via WiFi and not via 3G or 4G.
# js/network.js
const Network = function () {
    const init = function () {
        _getState();
    };
    const _getState = function () {
        $('#networkState').text('Network state');
    };
    return {
        init: init
    };
}();
2
3
4
5
6
7
8
9
10
11
We can adopt the example about connection.type almost completely in our app. Only the last line (the alert box) we are going to replace with a notification on the page.
- Copy the example code from cordova-plugin-network-information and paste it inside the method
_getState(). - Remove the alert-box and display the result in
h5#networkState.
const _getState = function () {
	// https://cordova.apache.org/docs/en/latest/reference/cordova-plugin-network-information/#constants
	console.log('Connections array', Connection);

	const networkState = navigator.connection.type;
	console.log('networkState', networkState);

	const states = {};
	states[Connection.UNKNOWN] = 'Unknown connection';
	states[Connection.ETHERNET] = 'Ethernet connection';
	states[Connection.WIFI] = 'WiFi connection';
	states[Connection.CELL_2G] = 'Cell 2G connection';
	states[Connection.CELL_3G] = 'Cell 3G connection';
	states[Connection.CELL_4G] = 'Cell 4G connection';
	states[Connection.CELL] = 'Cell generic connection';
	states[Connection.NONE] = 'No network connection';
	console.log('states', states);

	$('#networkState').text(`Network: ${states[networkState]}`);
};
2
3
4
5
6
7
8
9
10
11
12
13
14
15
16
17
18
19
20
REMARK
Test this functionality on your smartphone. The browser always displays the message Unkwown connection.
Note that the connection is tested only during the startup of the application. If you disconnect or change the connection, nothing will change on the screen. We can easily solve this by retesting the network at regular intervals.
- Within the init method, test the network status with an interval of 1 second (= 1000 ms).
const init = function(){
	setInterval(_getState, 1000);
};
2
3
- Change the network on your smartphone and check the text on the screen. (WiFi on/off, flight mode, ...)
# my_location Compass
# js/compass.js
const Compass = function () {
    let myCompass;
    const options = {
        frequency: 2000     //default is 100 (ms)
    };
    const init = function () {
        start();
    };
    const _compassSuccess = function (heading) {

    };
    const _compassError = function (error) {

    };
    const _update = function (txt, degr) {

    };
    const start = function () {

    };
    const stop = function () {

    };
    return {
        init: init,
        start: start,
        stop: stop
    };
}();
2
3
4
5
6
7
8
9
10
11
12
13
14
15
16
17
18
19
20
21
22
23
24
25
26
27
28
29
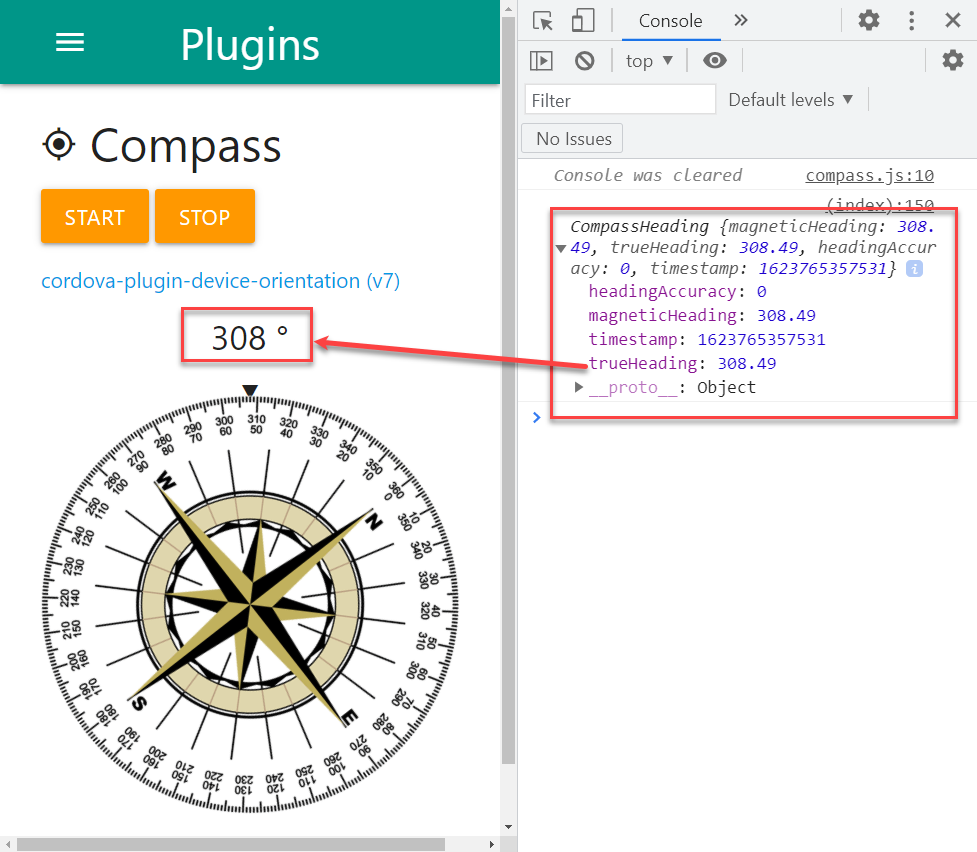
The cordova-plugin-device-orientation plugin gives you access to your smartphone's compass. The compass sensor detects the direction of the top of the device relative to north (north = 0°).
The index page contains a text field (h5#compass), an arrow (<p>▼</p>), a compass rose (img#compassImg) and two buttons (a#startCompass and a#stopCompass).
For now, we are only going to read the direction and write it in the text field h5#compass. In the assignment that follows, you are going to process the other elements.
The plugin is already a bit more complex and has three methods we can use:
navigator.compass.getCurrentHeading(compassSuccess, compassError)
Retrieve the direction (heading) once.var watchID = navigator.compass.watchHeading(compassSuccess, compassError, [compassOptions])
Continuously measures the direction to which we are pointing.navigator.compass.clearWatch(watchID);
Stop the measurement.
We need the second method for our application. We are going to continuously measure the direction and display it on the screen. If we translate the example code to our module, this becomes:
const _compassSuccess =  function(heading) {
	console.clear();
	console.log(heading);
	const degr = parseInt(heading.magneticHeading);
	const txt = `${degr} °`;
	_update(txt, degr);
};
const _compassError = function (error) {
	const degr = '0';
	const txt = (error.code === 3) ? '<b>Compass not supported</b>' : `<b>Fout: </b> ${error.code}`;
	_update(txt, degr);
};
const _update = function (txt, degr) {
	$('#compass').html(txt);
};
const start = function () {
	myCompass = navigator.compass.watchHeading(_compassSuccess, _compassError, options);
};
2
3
4
5
6
7
8
9
10
11
12
13
14
15
16
17
18
A new measurement is taken every two seconds.
The result appears in the console (console.log(heading)).
From this we can deduce that heading.magneticHeading contains the direction.
This number is fetched and is rounded to an integer on line 3.
The integer is passed along with the text variable txt to the method _update(txt, degr).
The method _update(txt, degr) displays the text on the screen.
(The degr parameter is not used at this time. You need this later).
- Test the application in Chrome and on your smartphone.
REMARK
The browser has no compass and generates a random number between 0 and 359 at each measurement!
# Exercise
The compass measures the values continuously. Even if the application disappears to the background.
To reduce the battery consumption, you are going to rework the application so that you can control the compass with the START and STOP buttons.
These are the requirements:
- Clear the
initmethod injs/compass.js.
The compass will not start up automatically. - From jQuery, add a click event to the
#startCompassbutton.
This event points toCompass.start(), which stops the compass first and then starts it back up. - From jQuery, add a click event to the
#stopCompassbutton.
This event points toCompass.stop()and stops the measurement. - Now look for a CSS3 property that allows you to rotate the image
img#compassImgaround its center. Incorporate the measured valuedegrinto the rotation.
# Install the app
- Put all unnecessary logs (
console.log(...)) in comments. - Create an icon for the app and place it in the resources folder.
$ cordova-res android --type icon1 - Install the meteo app on your smartphone and check the result.
$ cordova run android1
# Calibrating the Compass
For accurate measurement, you should regularly calibrate your smartphone's compass.
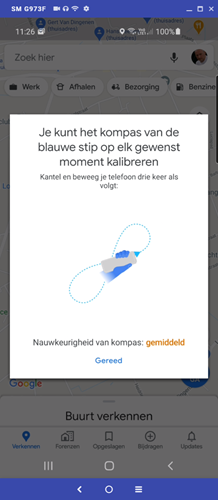
# Google Maps
- Open Google Maps app.
- Click on the blue marker that shows your location.
- In the lower left corner, click calibrate compass (kompas kalibreren).
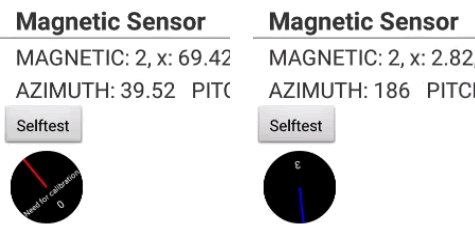
# Only for Samsung
- Open the phone app and enter the code
*#0*#. - Click on the Sensor tile.
- Look under Magnetic sensor. You will see a black circle with a line pointing north.
A red line means you need to calibrate the compass (image on the left). - Just like in the Maps app, make several "eights " until a blue line appears (image right).
- Exit the menu by clicking several times on the back button.